Thursday 21 July 2016

LR : How to create web_custom_request in LoadRunner


While working on the Flight Booking Application, 

I came across a scenario wherein there were multiple flights needed to be cancelled. The catch was that the count of flights to be cancelled was not fixed. Sometime, it could be 3, sometime 7 etc.


The cancellation request recorded via LoadRunner (in HTML mode) looked like below:


The solution to be above problem was to convert this request into a custom request to dynamically handle the number of flights.

Below is what I did,

I changed the recording options as below:


Then I regenerated the script via below option:


The cancellation request, after regeneration looked like below:


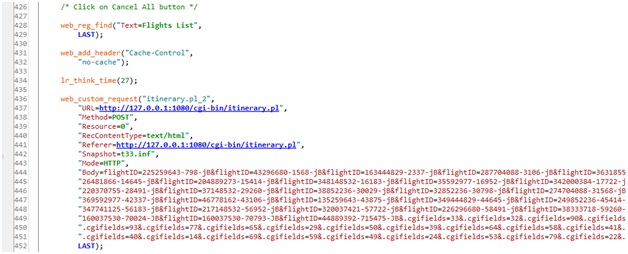
After close observation I understood that there is a repetition of below code, for every flight to be cancelled:

flightID=225259643-798-jB&
flightID=43296680-1568-jB&
flightID=163444829-2337-jB& and so on..

Additionally, there was a repetition of below as well,
.cgifields=33&
.cgifields=32&
.cgifields=90& and so on..

1.       I need to handle these in such a way as to capture each of these for every flight, concatenate them and then substitute in the request in step 3 above.

1.       Below is the code for the same:

a.       Correlations to be captured:-


b.       Code Logic:-


c.      Substitution in Cancellation Request:-


1.       Execution successful!!


Please note: There is a possibility that you might get the below error message during the script re-run:-


To resolve the above, all you need to do is to replace the failing request with its regenerated script counterpart. For ex: I got this error at sign off. So I replaced the Sign Off request as below, i.e. with its custom request:-


And the issue was resolved.

Cheers!!

Sunday 17 July 2016

LR : How to create a correlation rule in LoadRunner


~*~*~*~*~*~*~*~*~*~*~*~*~*~*~*~*~*~*~*~*~*~*~*~*~*~*~*~*~*~*~*~*~*~*~*~*~*~*~*
Steps:-
~*~*~*~*~*~*~*~*~*~*~*~*~*~*~*~*~*~*~*~*~*~*~*~*~*~*~*~*~*~*~*~*~*~*~*~*~*~*~*

  • Set the Recording Options under Correlations section as below:-


  • Then start the recording (mercury tours application is used here for demo purpose):


    • Book the Flight. Then check the itinerary by clicking on the Itinerary button:-


    •  Sign Off and stop the recording


    • Following dialogue box is displayed once the recording completes:-


    • Click on the Details down arrow to display the recording section from where the correlation left and right boundaries can be captured:


    Mentioned here for reference (Line 17 – marked in yellow above):

    <input type="hidden" name="userSession" value="118948.659133252zVVitcVpzftVzzzHDzHVApfcQQcf"/>

    • Close the Design Studio as we will be coming back to it in a short while. Reason for not using the “Add as Rule…” option right away is that the Application name will have to be selected from the existing list (shown below) whereas the rules that we want to create doesn't specifically belong to any of the listed applications. 


    •       So, First we will create an application as shown in below step and then come back to the design studio to create the rule against our newly created application. Launch the recording options and create the application with user defined name, say, mercury


    • Select Mercury application and click on New Rule button on the right. Then enter the below details:-


    • Please note that the second dialogue box (Advanced Correlation Properties) in the above snapshot comes upon clicking the Advanced… button. Click on Test… button once the rule has been created and validate the created rule as shown below:


    • Now, Launch Design Studio available under Design menu option (this is the same screen that gets generated once the script is freshly recorded)


    • Click on Replay&Scan button. The rule(s) that we created in the above steps will now be visible in the Design Studio, as shown below:-


    •  Select the Rule and Click on Correlate. The Status column should now show status as applied.
    •  Kudos!! You have created a correlation rule and applied it successfully. In a similar fashion, remaining rules can be created.
    ~*~*~*~*~*~*~*~*~*~*~*~*~*~*~*~*~*~*~*~*~*~*~*~*~*~*~*~*~*~*~*~*~*~*~*~*~*~*~*

    Tuesday 31 May 2016

    Angel on the train


    This happened while I was coming to Nagpur from Pune on 29/05 via Pune-Nagpur Garib Rath Express. When the train reached the Wardha station, I decided to come down on the platform to purchase bananas from the vendor. My wife requested me to take my baby, Raunak along as well to prevent his boredom. I readily obliged and came down with him on the platform, located the vendor and started going through his wares. When I had made the selection and started making payment, the vendor inquired as to which train I had come. When I let him know that it was Garib Rath Express, he remarked that the train was already leaving. I looked back horrified, and indeed it was. I made the payment in haste, thanked him and ran to catch the nearest coach reaching my 8th Coach was out of question.

    While I was running towards the nearest coach, two things crossed my mind: why did the driver not sound the horn and whether I would be able to reach the gate on time. I put all my effort and somehow managed to reach the gate of Coach 6; however, by the time I did, the train has picked up speed. My problem was compounded by the fact that I was carrying Raunak in my arms and there was no way I would be able to board with just one hand free. Then the help came from one of the most unexpected quarter. The ticket checker who was moving towards the next coach saw me and came to my rescue. He asked me to handover the baby first so that the baby would be free from harm. Also, there were better chances of me able to board with my both hands free. I did as suggested and was able to board successfully. I thanked him profusely while taking Raunak back in my arms.


    The Garib Rath Express logo:


    The Garib Rath Express:

    Wardha Junction:

    I, then, crossed over to my Coach to reach my wife and found her frantically fiddling with her phone in an attempt to call me. I let her know what had transpired and she was thankful that I was safe and expressed gratitude towards the unknown ticker checker and the vendor, who had informed me, in the first place, about the departing train. Days have passed since the incident, but every time I think of it, my heart gets filled with gratitude for the vendor as well as the ticket checker. I would never forget them :)


    Sunday 8 May 2016

    How to enable MiUi popups for apps like SCR Pro

    Almost all of you must have, at some point or the other , recorded your actions on the desktop. I have too. Lots of times, mainly due to being from IT background. So, was really excited to try the same on my mobile phone. Presently, I use xiaomi's mi3 as my daily driver. Prior to that i was hooked to Samsung Galaxy S3. I surfed through net to find out the list of such screen recorders and tried several of them. Will share their comparison in any upcoming blog. The one i liked the most is SCR Pro. The basic requirement for this recorder is that the phone should have been rooted. I got that done in a jiffy. Then upon launching it i got the below message:
    "MiUi popups disabled?.. If you can't see SCR Pro floating window go to ..."

    Below is what i did to resolve the issue:

    Pop-Up issue with SCR Pro:
    1. Go to settings
    2. Installed apps
    3. Tap on SCR Pro
    4. Go to the bottom of the screen i.e. to Permission manager
    5. Tap on Display pop-up window to enable
    6. You SCR pop-up will become visible on screen
    7. Hurray!!

    How to root Xiaomi's mi3 on MIUI 7.1.2.0

    How to root Xiaomi's mi3 on MIUI 7.1.2.0


    1. First download file called Update.zip from here

    2. Then Navigate to Update Screen And choose that file as Update.

    3. After Update, Download Super Su from Play Store And Update Binary when/if asked.

    4. Use Normal installation (give it some time).

    5. Done! Validate via any root checker.